HRIS Tips
Search for Pages
Using Search
The search option is useful for locating information and transaction pages.
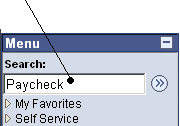
1. Enter search key word(s) (Ex: funding; pay check; time document; etc.)

2. Select the arrows … ![]() … or select the “enter” key.
… or select the “enter” key.
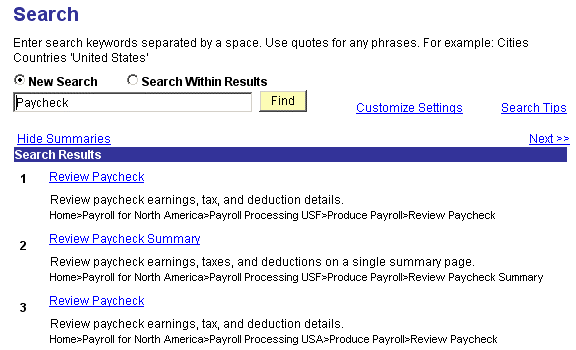
3. Search results will appear.

4. Select desired link to access page.
Search for Employee Data
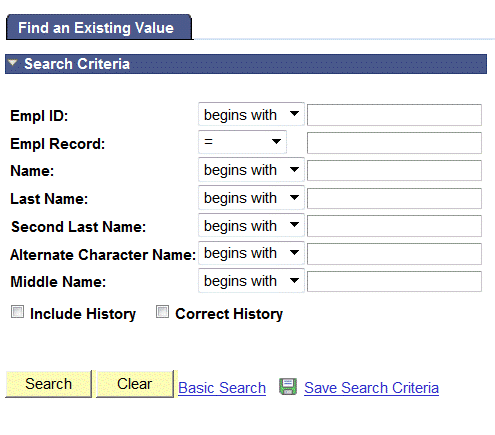
One or more criteria and full or partial values may be used when entering search criteria. Based on what is entered, HRIS uses the search record to present a list of possible matches or, if there is only one match, the page you requested.

Name: Last Name, First Name (No spaces)
Last Name: Last Name (any format)
Advanced Search: Displays ALL available search fields
Basic Search: Displays limited search fields
Navigation to Popular Pages
Address Update – View Personal Information
Workforce Administration > Personal Information > Modify a Person
Payroll Funding Update
Payroll for North America > Payroll Funding > Maintain Funding > Payroll Funding Table
Job Information View
Workforce Administration > Job Information > Review Job Information > All Jobs Summary
Pay Rate Changes
Workforce Administration > Job Information > Pay Rate Change
Subunits
Organizational Development > Position Management > KSU Main Subunits > Subunit Set Table & Subunit Assignment
Time and Leave Update
Time and Leave > Maintain Time and Leave > Employee by Paygroup
Time and Leave Documents
Time and Leave > Reports > Time Documents > Department Time Docs
Function Key:F11 & Resizing your desktop
Function Key:F11
The function key ... F11 ... toggles between full-screen and regular views.
- To enlarge a HRIS page ... select F11.
- To restore original page image ... select F11 again.
How to Change Resolution/Desktop Display
How to Change Resolution ... Desktop Display The best resolution for viewing HRIS pages is 1024 x 768 pixels. Follow these steps to view or update your desktop display settings.
- Close all software applications before beginning this process.
- Access the Control Panel by selecting the Windows "Start" Button > Settings > Control Panel > Display > Settings
- The display (colors and screen area) will appear.
- Jot down original Screen Area settings in case you want to change it back later.
- Change the display (Screen Area) by sliding the arrow either left or right on the bar. The best resolution for HRIS is 1024 by 768 pixels.
- Select "OK" ... the following message will appear: Windows will now reside your desktop. This could take a few seconds, during which your screen might flicker. Select "OK" at the bottom of this message.
- The following message will appear: You resized your desktop. Do you want to keep this setting? Select "Yes" at the bottom of this message.
- Close the Display Properties and Control Panel.
After completing these steps, your desktop will be resized for ALL applications. To change your desktop back to the original setting, follow these directions using the hand-written setting indicated below Step 2.
HRIS Data and Job Data Tips
Avoid Retyping
To avoid retyping the Employee Id, Department Id, Name, etc. when going from one Human Resource Information System (HRIS) application to another, use the following cut and paste method:
- After entering the Id or name in a dialog box, highlight and select the data by holding down on the left mouse button while dragging it across the selected field. Note: Depending on monitor colors, highlighting may not be visible.
- After highlighting/selecting the Id or name, use the "Control" and "Insert" keys together to select and store the data in a buffer.
- After entering the next HRIS application dialog box, place the cursor in the Id or name field, select the "Shift" and "Insert" keys together. The stored Id or name will appear.
View Job Data Multiple Positions
To view job information for employees who are in multiple positions, you may use the following path:
Workforce Administration > Job Information > Review Job Information > All Jobs Summary
After entering employee's ID or employee's name or employee's last name as search criteria in the dialogue box, select "OK".
This page will reveal all positions for the employee and will include the following information for each position:
Employee Name, Employee ID, Employee Rcd #, Effective Date, Seq #, Empl Status (i.e. active, terminated, etc.), Position Number, Action\Reason Codes, Job Code, Department, Employee Type, Standard Hours, Full-Time/Part-Time, Regular/Temporary, Pay Group, Compensation Frequency, Salary Plan, Grade, Last Check Date, Compensation Rate, and % Change (percent change in salary).
Viewing Reports
After executing a report, the report is stored in your report list for 30 days.
- Access Report List
- Reporting Tools > Report Manager > Administration Tab
- Set up "View Reports for" area as follows;
- Status: Blank
- Process type: Blank
- Last: 30 Days
- Select "Refresh" & executed reports will appear.
- If "View All" is highlighted, select it to view all reports in Report List.
- To view/print a report, select "View."
- Report/Log Viewer will appear.
- Open the .PDF or .CSV file to view"print the report.
After 30 days, the report(s) will automatically be expunged from the Report List.
Downloading data into Excel
- Access “Download” icon/grid

![]()
Keyboard Shortcuts
HRIS-HotKeys | ||
Hot Key | Button or Link | Action |
Alt + 1 | | Save Page |
Alt + 2 | | Return to the search page |
Alt + 3 | | View the next row in the search list |
Alt + 4 | | View the previous row in the search list |
Alt + 5 | | Opens the Look Up page or Calendar prompt |
Alt + 6 | | Opens the pop-up window on a page |
Alt + 7 | | Inserts rows in a grid or scroll area |
Alt + 8 | | Deletes rows in a grid or scroll area |
Alt + . *note: | | Next row in a grid or scroll area |
Alt + , *note: | | Previous row in a grid or scroll area |
Alt + ' *note: | | View all rows of data in grid or scroll area |
*Note: May be used with Update/Display All or Correction Modes.
